OCLP 在老旧Mac上遇到 App 崩溃 Namespace SIGNAL, Code 4 Illegal instruction:4 的解决办法

OCLP 是一个允许老旧Mac允许不被支持的系统解决方案,目前,如果你的机器CPU不支持 AVX/AVX2指令集,在更新到 Sequioa 后一些App会崩溃,报错。Namespace SIGNAL, Code 4 Illegal instruction: 4,这是因为 JetEngine.JSStack.scheduler 需要 AVX/AVX2 支持,否则就会报错。

目前越来越多的App会调用 JIT,甚至JavaScriptCore也会调用,这就导致相当多的App无法启动或正常加载,包括 Safari,Music,App Store等,目前的的解决办法是:

  1. 在OCLP 中注入 no AVX/AVX2 kext, 具体名称为
    NoAVXFSCompressionTypeZlib.kext
    NoAVXFSCompressionTypeZlib-AVXpel.kext
  2. 重启机器后在命令行输入一下命令:
    launchctl setenv JSC_useJIT true; launchctl setenv __XPC_JSC_useJIT true
  3. 再次开启会崩溃的App,问题解决。

这个方法仅限目前有效,以后再更新到新的系统,可能会无法禁用 JIT 调用,方法会失效。

这个方法同样适用于老旧 CPU 架构的 X86 用户,通常2012年之前的CPU都不支持AVX/AVX2,具体可以用 MacCPUID 查看。

macOS 15 Sequoia 如何修改 read only 的系统只读文件

随着苹果越来越严格的系统文件权限限制,在 Sequoia 下想要修改 /System 下的文件变得越来越难,现在几乎已经不可能在系统中直接修改。本文将介绍如何在 Recovery 恢复模式下修改系统文件价。

注意:修改系统文件可能会引起系统严重错误,导致系统无法开机、数据顺坏或被木马病毒破坏,在操作之前请清楚的知道你在做什么,否则请停止。

另外,有些地方提到可以在 /etc/synctheri.conf 添加映射来修改系统文件,其实这个是不准确的,synctheri.conf 只能映射目录到 / 根文件夹,是不能修改 /System 下的文件的。

教程开始:

  1. 重启系统,启动系统到 Recovery 模式
  2. 关闭SIP
    在Recovery 模式下打开终端,输入以下命令
    csrutil disable
    OpenCore 用户NVRM 里添新增 7C436110-AB2A-4BBB-A880-FE41995C9F82,然后添加键值 csr-active-config, 类型 Data, 值 67000000
  3. 重启系统,再次进入Recovery Mode
  4. 验证 SIP 是否关闭,打开终端输入命令
    csrutil status
    确认所有SIP保护项均已关闭
  5. 挂载要修改的系统根目录为可读写,终端输入命令:
    mount -uw /Volumes/Macintosh\ HD # 确认你的系统卷名称
    cd /Volumes/Macintosh\ HD
  6. 编辑、修改要改动的系统文件,这里以替换一个Framework文件为例,输入复制命令
    # 备份原始文件(可选)
    cp -R System/Library/PrivateFrameworks/TargetFramework ./TargetFramework.backup
    # 替换文件
    cp -R /path/to/your/Framework System/Library/PrivateFrameworks/
  7. 重建系统快照(关键,没有这一步重启后修改就没了,但是如果你的文件有问题,你的系统可能就会崩溃)
    bless --folder /Volumes/Macintosh\ HD/System/Library/CoreServices --bootefi --create-snapshot
  8. 重启系统,进入系统验证文件是否添加成功。
  9. 验证文件添加成功后,一定一定要记得回到 Recovery 模式关闭SIP,以确保系统安全。
    csrutil enable
  10. 重启,进入正常系统,修改结束。

如果修改 OpenCore 启动选择器的磁盘名称

修改 /System/Volumes/Preboot/uuid/System/Library/CoreServices/.disk_label.contentDetails 文件里的磁盘名称即可。

sudo nano /System/Volumes/Preboot/uuid/System/Library/CoreServices/.disk_label.contentDetails

uuid 替换成你的系统里显示的 uuid 即可。

如果系统SIP不允许的话,先关闭SIP,设置完成后再打开即可。

解决 macOS Sequoia SSH无法连接:kex_exchange_identification: read: Connection reset by peer

从 Sonoma 升级到 Sequoia 遇到过各种各样的SSH连接问题,其中包括但不限于
1. 防火墙问题
2. WiFi 隐私问题
3. 加密协议不匹配问题
4. SSH 版本强制 2.0 的问题

但今天又遇到一个新问题,通过SSH连接报错,提示 kex_exchange_identification: read: Connection reset by peer,看起来连接被中断,通过 Verbose Mode 查看SSH连接提示如下:

$ ssh -v [email protected]
OpenSSH_9.2p1 Debian-2+deb12u5, OpenSSL 3.0.15 3 Sep 2024
debug1: Reading configuration data /etc/ssh/ssh_config
debug1: /etc/ssh/ssh_config line 19: include /etc/ssh/ssh_config.d/*.conf matched no files
debug1: /etc/ssh/ssh_config line 21: Applying options for *
debug1: Connecting to 10.0.1.3 [10.0.1.3] port 22.
debug1: Connection established.
debug1: identity file /home/zhaoxitao/.ssh/id_rsa type -1
debug1: identity file /home/zhaoxitao/.ssh/id_rsa-cert type -1
debug1: identity file /home/zhaoxitao/.ssh/id_ecdsa type -1
debug1: identity file /home/zhaoxitao/.ssh/id_ecdsa-cert type -1
debug1: identity file /home/zhaoxitao/.ssh/id_ecdsa_sk type -1
debug1: identity file /home/zhaoxitao/.ssh/id_ecdsa_sk-cert type -1
debug1: identity file /home/zhaoxitao/.ssh/id_ed25519 type 3
debug1: identity file /home/zhaoxitao/.ssh/id_ed25519-cert type -1
debug1: identity file /home/zhaoxitao/.ssh/id_ed25519_sk type -1
debug1: identity file /home/zhaoxitao/.ssh/id_ed25519_sk-cert type -1
debug1: identity file /home/zhaoxitao/.ssh/id_xmss type -1
debug1: identity file /home/zhaoxitao/.ssh/id_xmss-cert type -1
debug1: identity file /home/zhaoxitao/.ssh/id_dsa type -1
debug1: identity file /home/zhaoxitao/.ssh/id_dsa-cert type -1
debug1: Local version string SSH-2.0-OpenSSH_9.2p1 Debian-2+deb12u5
kex_exchange_identification: read: Connection reset by peer
Connection reset by 10.0.1.3 port 22

通过 debug1: Connection established. 判断连接没有问题,防火墙OK,WiFi 隐私没问题。但是SSH客户端没有匹配到任何一种加密模式,开始排查加密问题,于是在 /etc/ssh/sshd_config.d/100-macos.conf 里增加了更宽泛的加密协议:

Read more

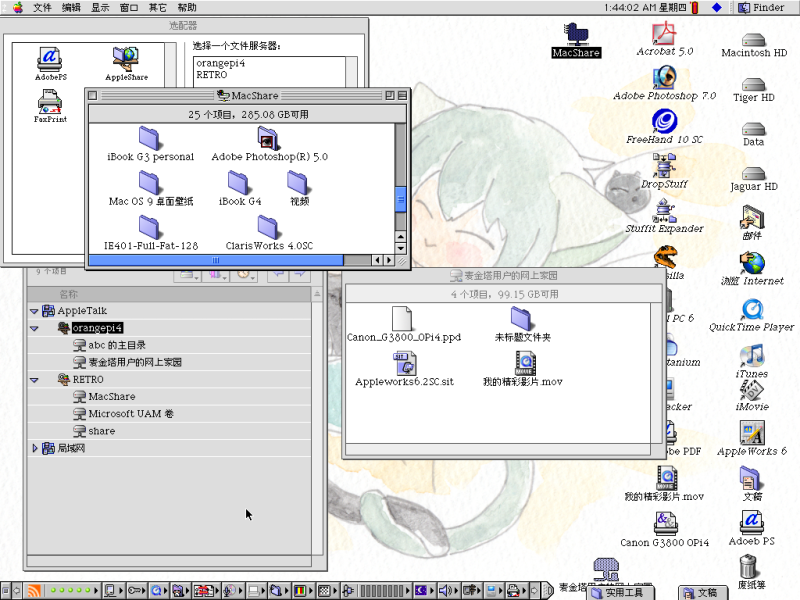
Netatalk —— 老Mac伴侣,组建AppleTalk网络

iBook G3连接局域网中的两台AppleTalk服务器,一台使用Netatalk,另一台使用Windows Server 2003

Netatalk是开源的AFP和AppleTalk文件共享服务器软件,可以在Unix和类Unix系统中运行。OpenWrt路由器甚至都可以部署Netatalk。

Netatalk有v2和v3两个大版本,对AFP支持的协议也不同。v2支持AppleTalk(包括时间服务器和打印服务器),AFP协议从1.1版支持到3.3版,可以支持Apple II、Mac System 6到Mac OS 9,也支持Mac OS X。 v3 不支持AppleTalk,但支持AFP 3.4协议,支持Spotlight索引,客户端至少需要System 7.5。Netatalk如果在Mac OS X中运行,那将不支持AppleTalk网络的搭建。

因此要搭建AppleTalk网络,还需要选择Netatalk v2版本,主要用于文件和打印机共享。服务器硬件是OrangePi 4,RK3399开发板,运行Armbian(Jammy Jellyfish版)。Netatalk v2版本选用2.3.1版本,非git版本。 Debian和Ubuntu源里的Netatalk已经是v3版本了,因此需要手动编译安装v2版本。编译安装教程可以参考Netatalk wiki:

Installing Netatalk 2 on Debian​netatalk.io/docs/Installing-Netatalk-2-on-Debian

安装

这里简要说一下步骤:

先安装编译工具和基本依赖:

sudo apt install build-essential libssl-dev libdb-dev autotools-dev automake libtool libtool-bin pkg-config libcups2-dev cups libavahi-client-dev libgcrypt20-dev tcpd libcrack2-dev libacl1-dev libldap2-dev quota libtirpc-dev

下载v2.3.1版本,解压

tar xf netatalk-2.3.1.tar.xz
cd netatalk-2.3.1

编译,安装需要root权限

./configure --enable-systemd --sysconfdir=/etc --with-uams-path=/usr/lib/netatalk
make
sudo make install
Read more

解决apt-get安装中的E: Sub-process /usr/bin/dpkg returned an error code (1)问题

 今天在用apt-get命令更新软件包的时候遇到找不到 apt-listchanges 的问题,用dpkg尝试修复报错 E: Sub-process /usr/bin/dpkg returned an error code (1)问题,尝试多种办法都无法解决,包括用apt强制卸载apt-listchanges,用dpkg尝试卸载apt-listchanges都无法解决,最后找到以下办法:

cd /var/lib/dpkg/
sudo mv info/ info_bak # 现将info文件夹更名
sudo mkdir info # 再新建一个新的info文件夹
sudo apt-get update # 更新
sudo apt-get -f install # 修复
sudo mv info/* info_bak/ # 执行完上一步操作后会在新的info文件夹下生成一些文件,现将这些文件全部移到info_bak文件夹下
sudo rm -rf info # 把自己新建的info文件夹删掉
sudo mv info_bak info # 把以前的info文件夹重新改回名

最后问题解决。

原文地址:https://www.cnblogs.com/bymo/p/9046586.html

如何彻底关闭 macOS Server 中的 Apache 服务,释放80 443端口

通常情况下,如果你想关闭 macOS 上的 Apache 服务,你只需要输入一下任意一个命令即可:

launchctl unload -w /System/Library/LaunchDaemons/org.apache.httpd.plist

apachectl stop

apachectl -k stop

但是,如果你在Mac上安装了 macOS Server,那么你将无法简单的关闭 Apache 服务。即使你输入以上命令,你会发现80和443端口依然被 Apache 占用,且打开网页会显示如本文开头的图片。“网站已关闭。管理员可以使用 Server 应用程序来打开这些网站。”

如果要彻底关闭 macOS Server 提供的 Apache 服务,你应该输入以下命令:

sudo launchctl unload -w /Applications/Server.app/Contents/ServerRoot/System/Library/LaunchDaemons/com.apple.serviceproxy.plist

Ngrok 搭建指南

文章转载至 Luozm’s Blog

ngrok是一个反向代理,它能够让你本地的web服务或tcp服务通过公共的端口和外部建立一个安全的通道,使得外网可以访问本地的计算机服务。ngrok1.x开源,ngrok2.x不开源。

ngrok

Ngrok的主要用途有以下几种:

  • 内网穿透,可代替vpn
  • 将无外网IP的desktop映射到公网
  • 临时搭建网络并分配二级域名
  • 微信二次开发的本地调试

自己搭建ngrok服务需要一台外网服务器,一个域名(如果只用来内网穿透好像也可以不要?)。本文中使用的服务器系统为Ubuntu 16.04。

Read more

CentOS6.4 搭建 LNMP+Postfix+Dovecot+Postfixadmin+Roundcubemail 企业邮件环境

1.先下载安装软件包并搭建好 LNMP 环境(略)

2.编译安装postfix-2.9.3。
2.1创建postfix用户和组,且指定GID最好为大于1000的数值。
# groupadd -g 2525 postfix
# useradd -g postfix -u 2525 -s /sbin/nologin -M postfix
# groupadd -g 2526 postdrop
# useradd -g postdrop -u 2526 -s /sbin/nologin -M postdrop

2.2 编译安装postfix

Read more

ABOUT

老赵的个人博客,关于 Mac, iPhone, iPad, iPod等产品的软件和硬件技术交流。也讨论Linux/UNIX技术,服务器运维技术等。